If you are new to home projects in Readington, New Jersey, installing a dryer vent may seem intimidating. The good news is that with the right materials, a clear plan, and attention to safety, you can set up a vent that helps your dryer work efficiently and keeps your home safe. This beginner-friendly guide explains everything in plain language: where to route the vent, what parts to buy, how to assemble them, and how to maintain the system once it is running. If you prefer a hands-off approach or want a professional to double-check your work, you can always arrange expert dryer vent installation so your setup is optimized from day one.
What a dryer vent does and why it matters
Clothes dryers create warm, humid air and release tiny fibers called lint. The vent carries that air and lint out of your home. If the vent is short and smooth inside, air moves quickly and carries lint away. If it is long, bumpy, or crushed, air slows down. Slow air means longer drying, higher energy use, and a greater chance that lint will build up and overheat. A good vent keeps your laundry routine short and your home safer.
Think of the vent as a slide. Kids go faster on a smooth, straight slide than on a long, bumpy one with sharp turns. Your dryer’s air behaves the same way. Your goal is to give that air the smoothest, shortest slide to the outdoors.
Basic parts you will need
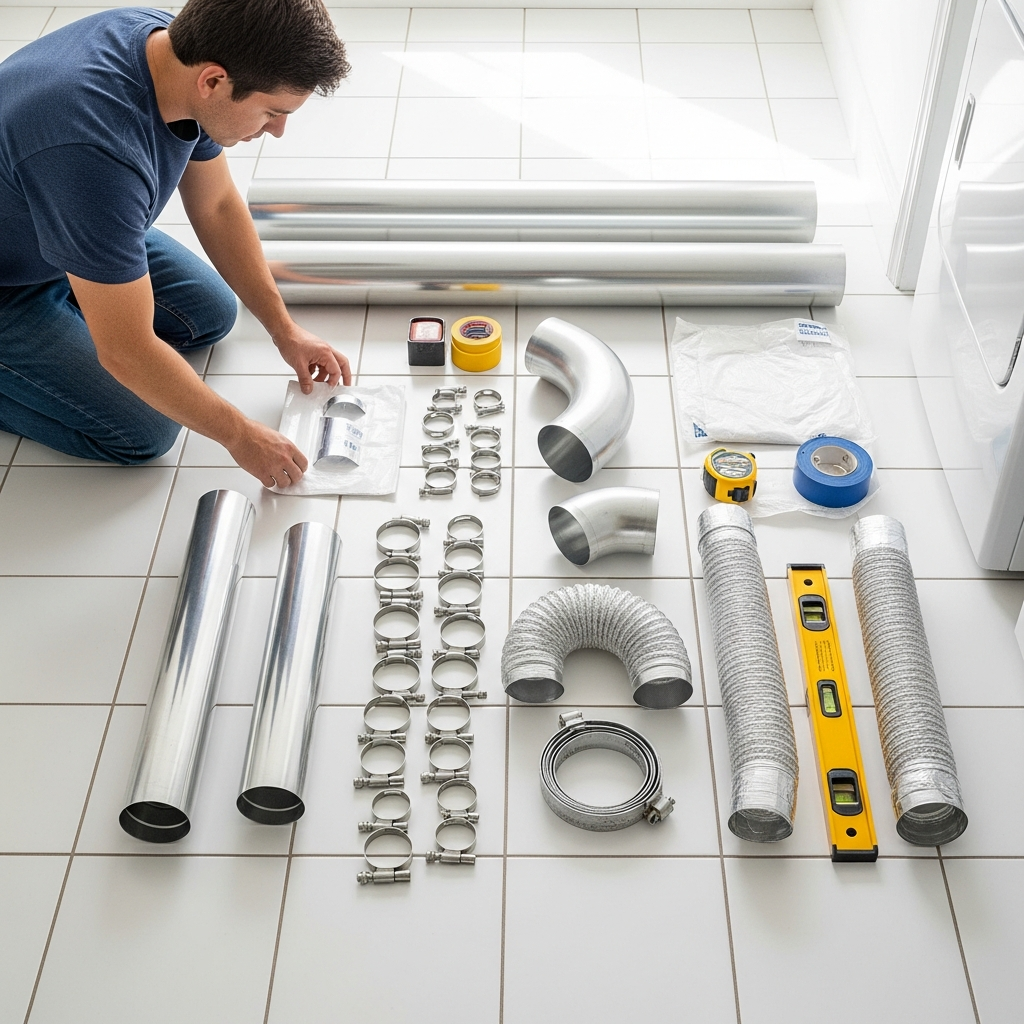
Gather your parts and tools before you begin. Choosing the right parts will make installation smoother and the finished vent easier to clean later.
- Transition duct: A short, semi-rigid aluminum tube that connects the dryer to the wall. It should be UL-listed for dryers.
- Main duct: Rigid aluminum or galvanized steel pipe (4 inches across) with smooth inside walls.
- Elbows: Curved pieces that let the duct turn. Long-radius elbows are better than tight ones.
- Exterior hood: The piece on the outside wall. It has a damper that opens when the dryer runs and closes afterward.
- Clamps and tape: Worm-gear clamps and high-temperature foil tape to hold and seal joints. Do not use plastic or cloth duct tape.
- Supports: Straps or hangers to keep long sections from sagging.
Helpful tools include a tape measure, drill, hole saw, snips, level, and a vacuum. If the laundry area is tight, a recessed vent box lets the dryer sit closer to the wall without crushing the transition.
Planning the route
Pick the shortest, straightest path to the outside. For many Readington homes with basements, that means going through the rim joist to a sidewall. In townhomes or interior laundry closets, a vertical run to the attic and out the roof may be necessary. Draw a simple sketch showing the dryer, the path, and the exit. Aim for as few elbows as possible and avoid running the vent through very cold spaces unless you can insulate the duct.
Before cutting, check both sides of the planned exit point. Look for wires, pipes, or anything else in the way. Drill a small pilot hole first to confirm your location and alignment.
Step-by-step installation for beginners
- Move the dryer: Unplug it or shut off gas if applicable. Gently pull the dryer away from the wall so you can work behind it.
- Mark the exit: From inside, mark where the duct will go through the wall. Drill a pilot hole and verify the spot from outside.
- Cut the opening: Use the correct hole saw size for your exterior hood. Cut carefully to avoid damaging siding or masonry.
- Install the exterior hood: Place the hood, seal around it with appropriate caulk, and screw it securely so it is plumb and square. Make sure the damper swings freely.
- Assemble the interior duct: Starting near the exit, dry-fit rigid duct pieces and elbows toward the dryer. Keep sections straight and use long, gentle turns.
- Seal the joints: Connect pieces so the crimped end points in the direction of airflow and seal each joint with high-temperature foil tape. Avoid screws that stick inside the duct.
- Support the run: Strap or hang the duct every 4 to 6 feet to prevent sagging.
- Attach the transition: Connect a short, UL-listed semi-rigid transition from the dryer to the wall connection. Keep it as straight as possible.
- Test the system: Run the dryer on air-fluff. Check outside to confirm the damper opens widely and that the airflow is steady.
- Push the dryer back: Leave enough space so the transition is not crushed. A recessed box helps in tight rooms.
Local tips for Readington homes
Our area has humid summers and cold winters. In winter, warm air inside the duct can hit cold surfaces and form condensation. If your vent passes through an attic, crawlspace, or unheated garage, wrap it with duct insulation and, where possible, keep horizontal runs slightly sloped toward the outside to let any moisture drain out. Mount the exterior hood high enough so snow piles and mulch do not block it, and keep shrubs trimmed back.
Older colonials may have thick walls that make cutting a side exit harder. In those cases, a roof exit can work well if the run is kept straight and the roof cap is installed correctly. Newer homes may have laundry closets that are tight behind the dryer—this is where a recessed vent box can prevent a crushed transition.
Common beginner mistakes and how to avoid them
- Using plastic or foil accordion hose for the whole run: These are for short transitions at best and can trap lint. Use rigid metal for most of the length.
- Too many bends: Every bend slows air. Plan for the fewest turns possible and use long-radius elbows.
- Screws inside the duct: They catch lint. Use foil tape and, where required, shallow rivets that do not poke inside.
- Terminating indoors: Never vent to an attic, garage, or crawlspace. Always go outdoors.
- Adding a screen at the hood: Screens clog with lint. Choose a hood with a damper that seals without a screen.
How to check your work
Good testing builds confidence. With the dryer set to air-fluff, go outside to see if the damper opens fully. You should feel strong, steady air blowing out. If it barely opens, there may be a kink or blockage. Listen for rattles that could mean a loose joint. Next, run a small load on heat. The air at the outlet should feel warm and slightly humid, and the laundry room should not get hot. If drying takes too long, recheck the route for extra bends or crushed sections.
Simple maintenance plan
After installation, keep the system clean. Empty the lint screen after every load and wash it monthly with mild soap to remove film. Every season, look at the exterior hood to confirm it opens easily and is free of lint, leaves, or snow. Once a year—twice if you do many loads or have pets—clean the duct with a rotary brush kit or schedule a professional cleaning. Keeping the vent clean protects your home and keeps drying times short.
When to ask for help
If you discover that your route is very long, includes many elbows, or runs through cold spaces you cannot easily insulate, getting help can save time and improve safety. A specialist can suggest reroutes, install long-radius elbows, and ensure all joints are sealed. In tight laundry closets, they can add a recessed box and position the dryer to avoid crushing the transition. For homeowners who prefer professional assurance, arranging professional dryer vent installation takes the guesswork out of planning and setup.
Frequently asked questions
Q: What size duct do I need? A: Most dryers use a 4-inch metal duct. Always check your appliance manual to confirm.
Q: How far can my vent run? A: Shorter is better. Each bend adds resistance. Compare your total length and elbow count with the dryer manual’s limit for equivalent length.
Q: Can I use a booster fan to fix a long run? A: Sometimes, but only if rerouting is impossible. Use a booster fan listed for dryer use and make sure it is easy to reach for cleaning.
Q: Is a roof exit okay? A: Yes, if the run is kept straight, the cap is well installed, and any attic section is insulated. Many homeowners still prefer a sidewall exit for easier access.
Q: How often should I clean the vent? A: At least once a year; more often for large households or if drying times increase.
Q: Do dryer sheets cause problems? A: They can leave residue on the lint screen, reducing airflow. Wash the screen monthly with mild soap.
Make your laundry routine safer and faster
With a clear plan and the right materials, beginners can create a safe, efficient vent that stands up to Readington’s seasons. If you decide to hand the project to a pro or want a second set of eyes on your plan, schedule dependable dryer vent installation and enjoy reliable drying from day one.
