Repairing the air ducts that move heated and cooled air through your home can dramatically improve comfort, energy efficiency, and indoor air quality. Yet it is critical to approach this work with a focus on safety. Sharp sheet metal edges, dust and debris, hidden electrical elements, and tight spaces all introduce hazards that require planning, patience, and the right protective gear. If you live in Readington, New Jersey, you also face a climate that swings from humid summers to chilly winters, which puts additional demands on your duct system. Before you start, set a goal to protect your health, preserve your equipment, and keep the rest of the house clean and functional during the project.
Begin by clarifying which tasks are realistic for a homeowner to handle and which are better left to professionals. Small leaks at accessible joints, deteriorated mastic or tape, minor vibration issues, and simple insulation touch-ups can often be addressed safely with basic tools and careful technique. However, concealed sections inside walls, fire-rated assemblies, asbestos-containing insulation, and any repairs that require modifying load-bearing framing or electrical components should be deferred to trained technicians. If you are unsure, get a second opinion. And before you undertake any air duct repair, create a written checklist of steps to follow and hazards to avoid so you do not rush midway through the job.
Plan for safety before touching the system
Safety planning begins with preparation. Map your duct layout as best as you can from accessible areas like the basement, crawlspace, utility room, and attic. Identify the air handler, supply trunk, return trunk, and branches. Look for gas lines, electrical conduits, and plumbing near or crossing ducts. Mark off cramped or awkward spaces so you can decide whether you can enter safely and work without strain. Confirm that you have adequate lighting, stable walking surfaces, and a way to keep tools organized and within reach to prevent trips or cuts.
Turn off the HVAC system at the thermostat and the breaker panel. Wait several minutes for the blower to stop completely. If you will remove any panels on the air handler, confirm there is no residual voltage at service points using a non-contact tester. Keep children and pets out of the work area, and set aside plastic sheeting or clean drop cloths to protect carpets and furnishings from dust. Good ventilation matters too; when you open duct sections, dust and fibers can become airborne quickly. Work with a window open where practical, and use a portable fan to move fresh air through.
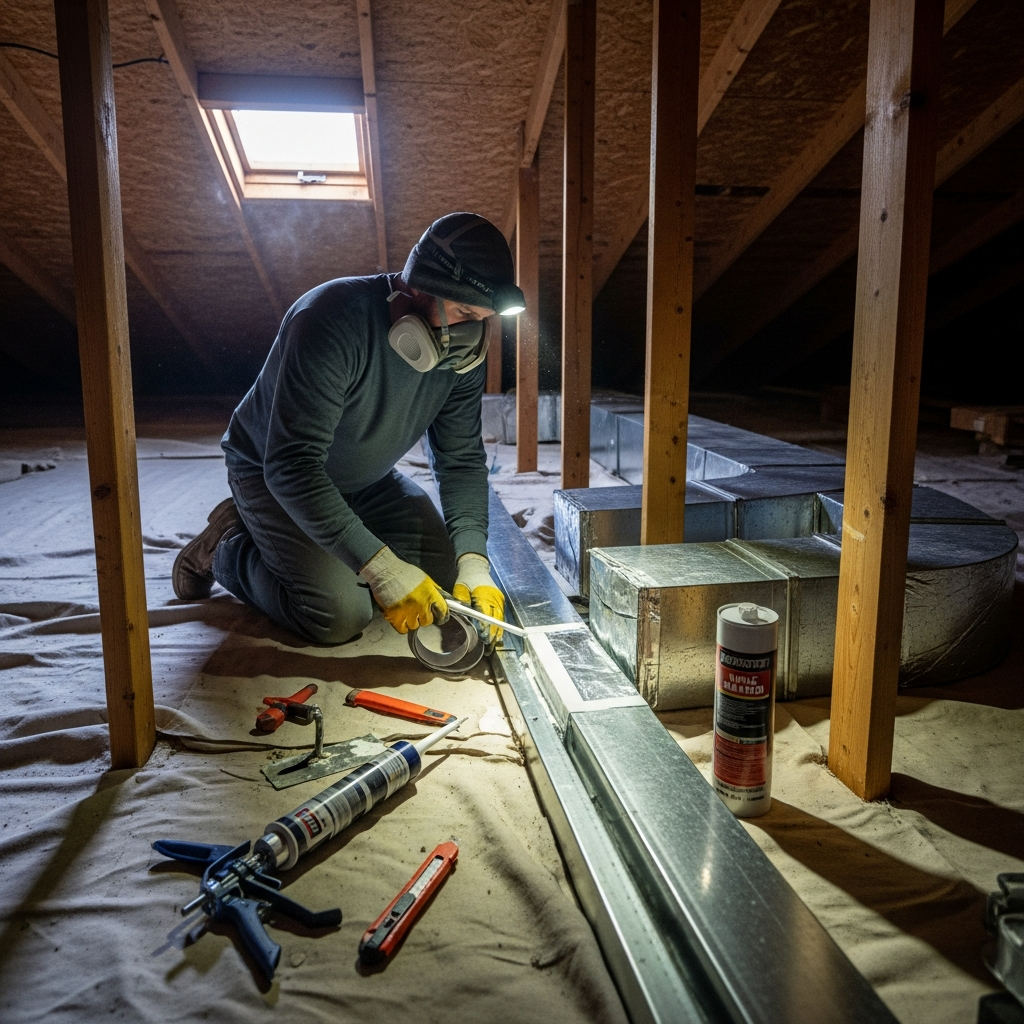
Personal protective equipment should match the task. Wear cut-resistant gloves for handling sheet metal and tin snips. Use a snug-fitting respirator with appropriate filters when working around old insulation or heavy accumulations of dust. Eye protection is non-negotiable; small screws and metal shards can fall unexpectedly. A long-sleeve shirt, sturdy pants, and knee pads help prevent scrapes and bruises, especially if you are navigating tight attic joists or crawlspaces. Have a fully charged flashlight or headlamp for visibility, and keep a first-aid kit close at hand.
Understand common duct problems in Readington homes
Readington’s weather and housing stock influence which duct problems you are most likely to encounter. Older homes may have sections of flexible duct that were bent too sharply or compressed by storage in the attic, limiting airflow. Metal trunks can develop gaps at seams as mastic dries out or vibration loosens screws over time. In basements and crawlspaces, condensation can develop on cold ducts during humid months, which may lead to rust or nearby mold if insulation is inadequate. In attics, insulation can be displaced by rodents or foot traffic, and UV from roof heat can accelerate deterioration of certain duct materials at transitions.
Indoors, you may notice signs that hint at specific problems. Uneven room temperatures, dusty return grilles, whistling sounds, and lingering odors are common indicators. Rooms far from the air handler often suffer first when there are hidden leaks or restrictions. Allergies that worsen when the blower runs or visible dust streams near supply registers suggest infiltration of unfiltered air from basements or attics. Recognizing these clues helps you prioritize which sections to inspect and repair without tearing into every run of duct at once.
Tools and materials for safe, durable repairs
Assemble the right tools before you start to minimize mid-project scrambling. For inspection, carry a flashlight, mirror, or a small inspection camera if available. For cleaning accessible sections, a soft brush, rags, and a vacuum with a HEPA filter can help. For sealing and fastening, gather HVAC-rated mastic, quality foil tape with UL listing, sheet metal screws, a cordless driver, tin snips, and a crimping tool. For insulation touch-ups, obtain duct wrap or sleeves with proper R-value, along with mechanical fasteners and foil tape to seal seams. Never substitute ordinary cloth duct tape, which fails quickly in HVAC environments.
When choosing materials, look for products labeled for HVAC use and able to withstand the temperatures and moisture conditions in a New Jersey basement or attic. Mastic should remain flexible after curing, and foil tape should have strong adhesive resistant to humidity. If you need to support sagging flexible duct, use wide, smooth straps rather than thin wire that can cut into the material. For noise control at the air handler, closed-cell foam pads can isolate vibration, but avoid blocking any air intakes or safety panels.
Step-by-step process for safe repair
Start with a visual inspection while the system is off. Trace the supply trunk from the air handler outward, looking for loose connections, open knockouts, gaps at takeoffs, and poorly sealed seams. On flex runs, check for crushed sections or kinks near tight turns. Gently press on insulation to feel for rigid duct beneath; severe flattening often indicates a restriction. Inspect the return side just as carefully, because unsealed returns can draw dirty or humid air straight into the system.
Next, identify active leaks. One simple method is the bright light test: in a darkened space, place a bright light inside the duct near a seam and look from the outside for light leaks. Another is the hand test: with the blower briefly turned on, feel for drafts around joints, but only do this where there is no risk of contact with moving parts or live wires, and return power to off immediately when finished. Mark all suspect spots with a wax pencil so you can find them again when you apply sealant.
Prepare the surface before sealing. Dust, oil, and old adhesive must be removed for mastic and foil tape to bond. Wipe with a damp rag, allow to dry, and, if needed, lightly scuff shiny metal so mastic adheres. Apply mastic generously with a brush at seams, elbows, takeoffs, and around the base of supply boots. Smooth the layer to ensure continuous coverage, and reinforce with foil tape where movement or vibration is likely. For flexible duct connections, ensure the inner liner is fully seated over the metal collar and secured with a mechanical clamp before sealing the exterior jacket and insulation seam with foil tape.
Address insulation gaps where ducts run through unconditioned spaces. Any bare metal exposed to attic or crawlspace conditions will sweat in summer and waste heat in winter. Wrap with appropriately rated insulation and seal all joints. Maintain clearances from flues and combustion appliances, following manufacturer guidelines and local code. Do not bury junctions or service panels under insulation; leave access visible and reachable for future maintenance.
While working, keep ergonomics in mind. Take frequent breaks to avoid fatigue that leads to mistakes. If you must work in the attic, do so in the morning when temperatures are lower. Use a sturdy piece of plywood across joists for a stable platform. If you feel off-balance or strained, stop and reposition rather than pushing through in an awkward stance. Safe pace beats fast pace every time.
Testing your results and documenting improvements
When repairs are complete, test your work methodically. Restore power at the breaker and run the blower. Listen for whistling, rattles, or drumming that suggest loose sections. Use a handheld anemometer if you have one to compare airflow at registers before and after repairs. Even without tools, you can use the tissue test: a lightweight tissue held near a supply should flutter consistently; weak or uneven movement might signal a lingering restriction. Check that rooms previously struggling with comfort now warm up or cool down more evenly.
Consider simple balancing adjustments. Partially closing a damper in an over-supplied branch can redirect more air to rooms further down the line. Make small changes and wait several minutes to see the effect. Document everything you adjust, photograph newly sealed seams, and note any areas you could not reach safely. This record helps you, or a future technician, target remaining issues without repeating steps.
When to bring in a professional
There are clear signs it is time to pause and consult a licensed HVAC technician. If you suspect contaminated insulation, if ducts pass through tight wall cavities, or if the air handler shows signs of electrical or refrigerant issues, step back. In Readington, many homes have a mix of rigid metal and flexible duct, plus older transitions that do not meet modern standards. A pro can perform a pressure test, measure duct static pressure, and evaluate equipment settings that interact with your ductwork. When safety or building code questions arise, expert guidance is the responsible choice. In the middle of your project, do not hesitate to schedule professional air duct repair if scope or risk exceeds your comfort level.
Local considerations for Readington, New Jersey
Seasonal humidity is a big factor. Summer moisture can condense on cool metal ducts running through basements and crawlspaces, so vapor barriers and continuous insulation are crucial. Winter’s dry air can shrink some materials slightly, opening hairline gaps at seams or around boots where floors meet registers. Keep an eye on pest activity in rural or wooded parts of the township; rodents sometimes disturb insulation or chew flexible duct. If your home uses oil or gas heat, maintain clearances from flues and combustion air intakes, and install carbon monoxide alarms on each level as a standard safety practice.
Local building practices also matter. Many homes in Readington have partially finished basements, where returns may be open to utility rooms. Sealing returns in these areas can significantly reduce dust and improve air quality. In older colonials, long supply runs to second-floor bedrooms can be undersized; careful sealing helps, but you may also need a professional to assess whether resizing or adding returns is warranted. Document what you find and discuss options with a contractor if performance still lags after your repairs.
Mistakes to avoid
A few common missteps can undermine results or create hazards. Avoid using standard cloth duct tape; it dries out and fails. Do not block balancing dampers in a fully closed position unless directed by airflow measurements; starving the system can increase static pressure and stress the blower. Never rest heavy storage on attic ducts, and never support flexible duct with narrow wire. Do not seal around a furnace cabinet in a way that prevents panel removal for service. Finally, do not run the system immediately after applying thick layers of mastic; give it time to cure as directed by the manufacturer, and ventilate the work area during curing.
Frequently asked questions
How often should I inspect my ducts? A seasonal check in spring or early summer, and again before winter, is a practical rhythm for Readington’s climate. Look for loose connections, missing insulation, and signs of condensation or dust streaks.
What kind of tape should I use? Use UL-listed foil tape designed for HVAC systems. It adheres well to clean metal and resists humidity. For most seams, combine mastic with foil tape for a robust, flexible seal.
Is it safe to clean inside ducts myself? Light surface cleaning at accessible points is generally fine, but avoid pushing brushes or vacuums deep into the system where you can damage lining or dislodge debris. If you suspect heavy buildup, consult a pro with specialized equipment.
Can I close vents in unused rooms to save energy? Fully closing registers can create pressure issues. A better approach is to balance airflow slightly and focus on sealing leaks, which improves efficiency without stressing the system.
What if my ducts are noisy after a repair? Rattling can indicate unsecured sections or screws that loosened during work. Verify all connections are tight. Drumming sounds may benefit from vibration isolation near the air handler, but ensure you do not restrict airflow.
Do I need permits for duct changes? Minor sealing and insulation touch-ups usually do not require permits, but larger modifications might. Check with local authorities or consult a licensed contractor for guidance before altering layout or capacities.
Ready to improve comfort and safety
If you approach the job with care, patience, and proper equipment, you can make meaningful improvements to comfort and air quality while protecting your home and your health. Start with a clear plan, proceed methodically, and test your results so you know the repairs worked. Document what remains for a future visit, and keep safety at the center of every decision.
When you want expert hands, trusted tools, and proven methods that comply with local practices, reach out to a qualified team in Readington. Schedule an evaluation, ask questions about materials and techniques, and expect clear communication before anyone begins work in your home. For dependable results and peace of mind, contact the specialists who focus on your neighborhood and climate, and book professional air duct repair services to restore smooth, efficient airflow throughout your house.
